> ## Documentation Index
> Fetch the complete documentation index at: https://api.xcompute.us/llms.txt
> Use this file to discover all available pages before exploring further.
# Claude Code CLI 与桌面端配置教程
> 手动安装 Claude Code CLI 和 Claude Desktop,分别通过 settings.json 与 Third-Party Inference 接入 Xcompute。
Claude Code CLI 和 Claude Desktop 都可以接入 Xcompute,但当前版本使用两种不同的配置入口:CLI 修改 `~/.claude/settings.json`,桌面端使用内置的 **Configure Third-Party Inference** 界面。
本教程只使用 Anthropic 官方 Claude Code、Claude Desktop 和系统自带文本编辑器。**不需要安装 CC Switch 或其他切换、代理软件。**
如果你不熟悉下载安装包、PowerShell、终端、命令或配置文件,请先阅读 [电脑基础使用扫盲](/computer-basics)。
## 先分清两套配置
| 使用方式 | Xcompute 配置入口 | 适用范围 |
| --------------- | ----------------------------------------------- | ---------------------------------- |
| Claude Code CLI | `~/.claude/settings.json` | PowerShell、终端、IDE 中运行的 Claude Code |
| Claude Desktop | **Developer > Configure Third-Party Inference** | Claude Desktop 第三方推理模式 |
| 普通 Chat 标签 | 没有自定义 API 输入框 | 默认使用 Claude 官方服务 |
不要只修改 `settings.json` 后就认为桌面端已经接入。最新版 Claude Desktop 的 Gateway 路由使用独立的第三方推理配置,普通 Chat 登录模式也不会读取 `ANTHROPIC_BASE_URL`。
## 第一步:安装 Node.js
如果你已经按照 OpenCode 或 Codex 教程安装了 Node.js 24,执行 `node -v` 和 `npm -v` 能显示版本号,可以直接跳到下一步。
点击 [下载 Node.js 24 Windows 64 位 MSI](https://npmmirror.com/mirrors/node/v24.18.0/node-v24.18.0-x64.msi),下载后双击安装,并使用默认选项完成安装。
点击 **开始菜单**,输入 `PowerShell` 并打开,然后执行:
```powershell theme={null}
node -v
npm -v
```
点击 [下载 Node.js 24 macOS PKG](https://npmmirror.com/mirrors/node/v24.18.0/node-v24.18.0.pkg),下载后双击安装,并按照界面提示完成安装。
按 `Command + 空格键`,输入“终端”并打开,然后执行:
```bash theme={null}
node -v
npm -v
```
Debian 或 Ubuntu 执行:
```bash theme={null}
curl -fsSL https://deb.nodesource.com/setup_24.x | sudo -E bash -
sudo apt install -y nodejs
```
Fedora 或 RHEL 执行:
```bash theme={null}
curl -fsSL https://rpm.nodesource.com/setup_24.x | sudo bash -
sudo dnf install -y nodejs
```
需要使用 NVM 或其他架构安装包时,请参考 [OpenCode 安装教程中的 Node.js 章节](/opencode-install#第一步直接安装-nodejs)。
## 第二步:安装 Claude Code CLI
Windows、macOS 和 Linux 都可以使用同一条 npm 命令:
```bash theme={null}
npm install -g @anthropic-ai/claude-code
```
安装完成后验证:
```bash theme={null}
claude --version
```
看到 Claude Code 版本号即表示安装成功。
macOS、Linux 和 WSL 执行:
```bash theme={null}
curl -fsSL https://claude.ai/install.sh | bash
```
Windows PowerShell 执行:
```powershell theme={null}
irm https://claude.ai/install.ps1 | iex
```
## 第三步:安装 Claude Desktop
桌面端是可选项。只使用 CLI 的用户可以直接跳到“创建 `settings.json`”。
建议访问 [Claude 官方下载页面](https://claude.ai/download) 获取最新版本,也可以使用下方官方入口:
| 系统 | 下载地址 |
| ---------------------------- | --------------------------------------------------------------------------------------- |
| macOS(Intel / Apple Silicon) | [下载 Claude DMG](https://claude.ai/api/desktop/darwin/universal/dmg/latest/redirect) |
| Windows(x64) | [下载 Claude 安装程序](https://claude.ai/api/desktop/win32/x64/setup/latest/redirect) |
| Windows(ARM64) | [下载 Claude ARM64 安装程序](https://claude.ai/api/desktop/win32/arm64/setup/latest/redirect) |
| Linux(Beta) | [查看官方 Linux 安装说明](https://code.claude.com/docs/en/desktop-linux) |
* macOS:打开 DMG,将 Claude 拖入 **Applications** 文件夹。
* Windows:打开安装程序,按照界面提示完成安装。
* Linux:按照官方页面选择 apt 或 DEB 安装方式。
Windows 的 Claude Desktop Code 标签需要 Git for Windows。如果尚未安装,请从 [Git 官网](https://git-scm.com/downloads/win) 下载并安装,然后完全退出并重新打开 Claude Desktop。
安装后打开 Claude Desktop。Code 标签首次运行时可能提示安装本地依赖:
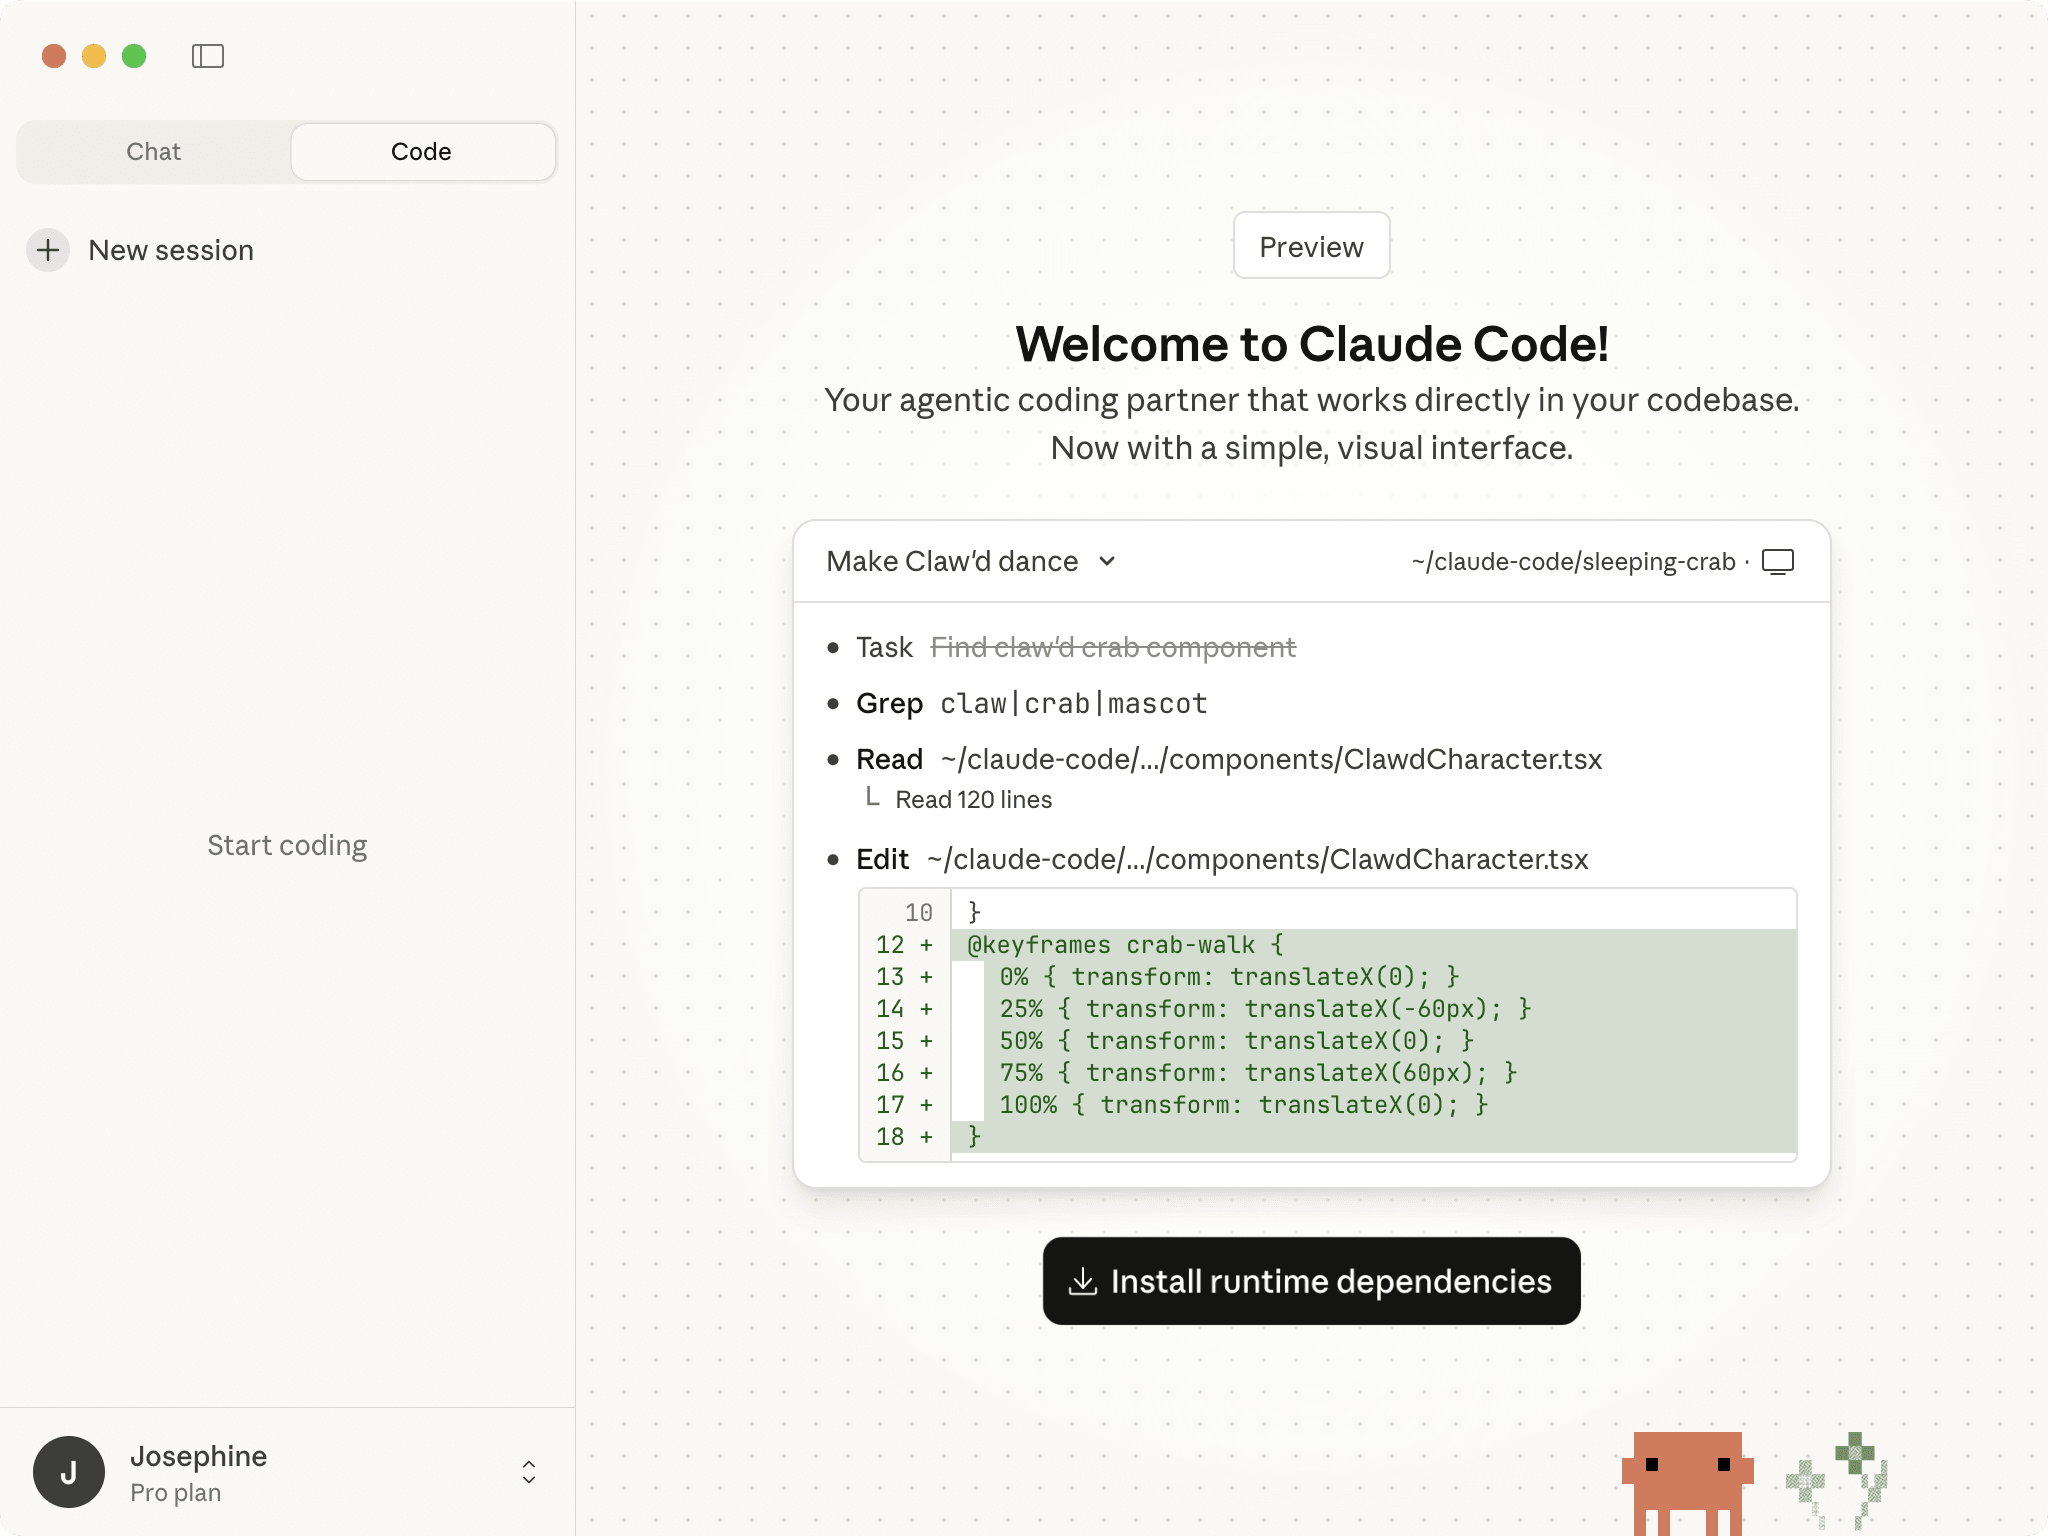 *公开教程中的 Claude Desktop Code 初始化界面,实际布局可能随版本更新。[查看截图来源](https://www.bannerbear.com/blog/how-to-install-claude-code-terminal-ide-web-desktop-setup/)*
## 第四步:在桌面端配置 Xcompute
Claude Desktop 的第三方 API 配置需要从登录页面进入开发者模式。不要先登录普通 Claude 账号。
### 1. 启用 Developer Mode
1. 停留在 Claude Desktop 登录页面。
2. 点击窗口左上角的菜单按钮 `☰`。
3. 选择 **Help > Troubleshooting**。
4. 点击 **Enable Developer Mode**。
1. 停留在 Claude Desktop 登录页面。
2. 点击屏幕顶部菜单栏中的 **Help**。
3. 选择 **Troubleshooting > Enable Developer Mode**。
启用后,应用菜单中会出现 **Developer**。
### 2. 打开第三方推理配置
在应用菜单中依次点击:
```text theme={null}
Developer > Configure Third-Party Inference…
```
如果没有看到该菜单,请完全退出 Claude Desktop,重新打开后再次检查 Developer Mode 是否已经启用。
### 3. 填写 Gateway 信息
在配置窗口左侧选择 **Connection**,然后填写:
| 界面字段 | 填写内容 |
| ------------------- | ----------------------------- |
| Inference provider | **Gateway** |
| Gateway base URL | `https://intl.dualseason.com` |
| Credential kind | **Static API key** |
| Gateway API key | 你的 Xcompute API Key |
| Gateway auth scheme | **Bearer** |
默认推荐 `https://intl.dualseason.com`。具备稳定科学上网能力时可以使用 `https://xcompute.us`。两个地址都不要添加 `/v1`,Claude Desktop 会自动请求 `/v1/messages`。
Xcompute 使用 Bearer 认证时,**Gateway auth scheme** 必须选择 **Bearer**。不要选择 `x-api-key`,除非你的 Xcompute 接口明确要求该方式。
### 4. 配置模型
如果桌面端能从 Xcompute 的 `/v1/models` 自动读取模型,模型列表会自动出现。如果没有出现,请在配置窗口的 Models 区域手动添加当前可用的 Claude 模型 ID,例如:
* `claude-sonnet-5`
* `claude-opus-4-8`
* `claude-fable-5`
模型 ID 以 [Xcompute 模型定价页面](https://xcompute.us/pricing) 的当前列表为准。
### 5. 应用到本机
检查配置无误后,点击 **Apply locally**。Claude Desktop 会把第三方推理配置写入本机并重新启动。
**Apply locally** 用于当前电脑直接测试。**Export** 用于企业通过 MDM 批量部署,个人用户不需要导出 `.mobileconfig` 或 `.reg` 文件。
配置成功后进入 Code 标签,可以创建 Local 会话:
*公开教程中的 Claude Desktop Code 初始化界面,实际布局可能随版本更新。[查看截图来源](https://www.bannerbear.com/blog/how-to-install-claude-code-terminal-ide-web-desktop-setup/)*
## 第四步:在桌面端配置 Xcompute
Claude Desktop 的第三方 API 配置需要从登录页面进入开发者模式。不要先登录普通 Claude 账号。
### 1. 启用 Developer Mode
1. 停留在 Claude Desktop 登录页面。
2. 点击窗口左上角的菜单按钮 `☰`。
3. 选择 **Help > Troubleshooting**。
4. 点击 **Enable Developer Mode**。
1. 停留在 Claude Desktop 登录页面。
2. 点击屏幕顶部菜单栏中的 **Help**。
3. 选择 **Troubleshooting > Enable Developer Mode**。
启用后,应用菜单中会出现 **Developer**。
### 2. 打开第三方推理配置
在应用菜单中依次点击:
```text theme={null}
Developer > Configure Third-Party Inference…
```
如果没有看到该菜单,请完全退出 Claude Desktop,重新打开后再次检查 Developer Mode 是否已经启用。
### 3. 填写 Gateway 信息
在配置窗口左侧选择 **Connection**,然后填写:
| 界面字段 | 填写内容 |
| ------------------- | ----------------------------- |
| Inference provider | **Gateway** |
| Gateway base URL | `https://intl.dualseason.com` |
| Credential kind | **Static API key** |
| Gateway API key | 你的 Xcompute API Key |
| Gateway auth scheme | **Bearer** |
默认推荐 `https://intl.dualseason.com`。具备稳定科学上网能力时可以使用 `https://xcompute.us`。两个地址都不要添加 `/v1`,Claude Desktop 会自动请求 `/v1/messages`。
Xcompute 使用 Bearer 认证时,**Gateway auth scheme** 必须选择 **Bearer**。不要选择 `x-api-key`,除非你的 Xcompute 接口明确要求该方式。
### 4. 配置模型
如果桌面端能从 Xcompute 的 `/v1/models` 自动读取模型,模型列表会自动出现。如果没有出现,请在配置窗口的 Models 区域手动添加当前可用的 Claude 模型 ID,例如:
* `claude-sonnet-5`
* `claude-opus-4-8`
* `claude-fable-5`
模型 ID 以 [Xcompute 模型定价页面](https://xcompute.us/pricing) 的当前列表为准。
### 5. 应用到本机
检查配置无误后,点击 **Apply locally**。Claude Desktop 会把第三方推理配置写入本机并重新启动。
**Apply locally** 用于当前电脑直接测试。**Export** 用于企业通过 MDM 批量部署,个人用户不需要导出 `.mobileconfig` 或 `.reg` 文件。
配置成功后进入 Code 标签,可以创建 Local 会话:
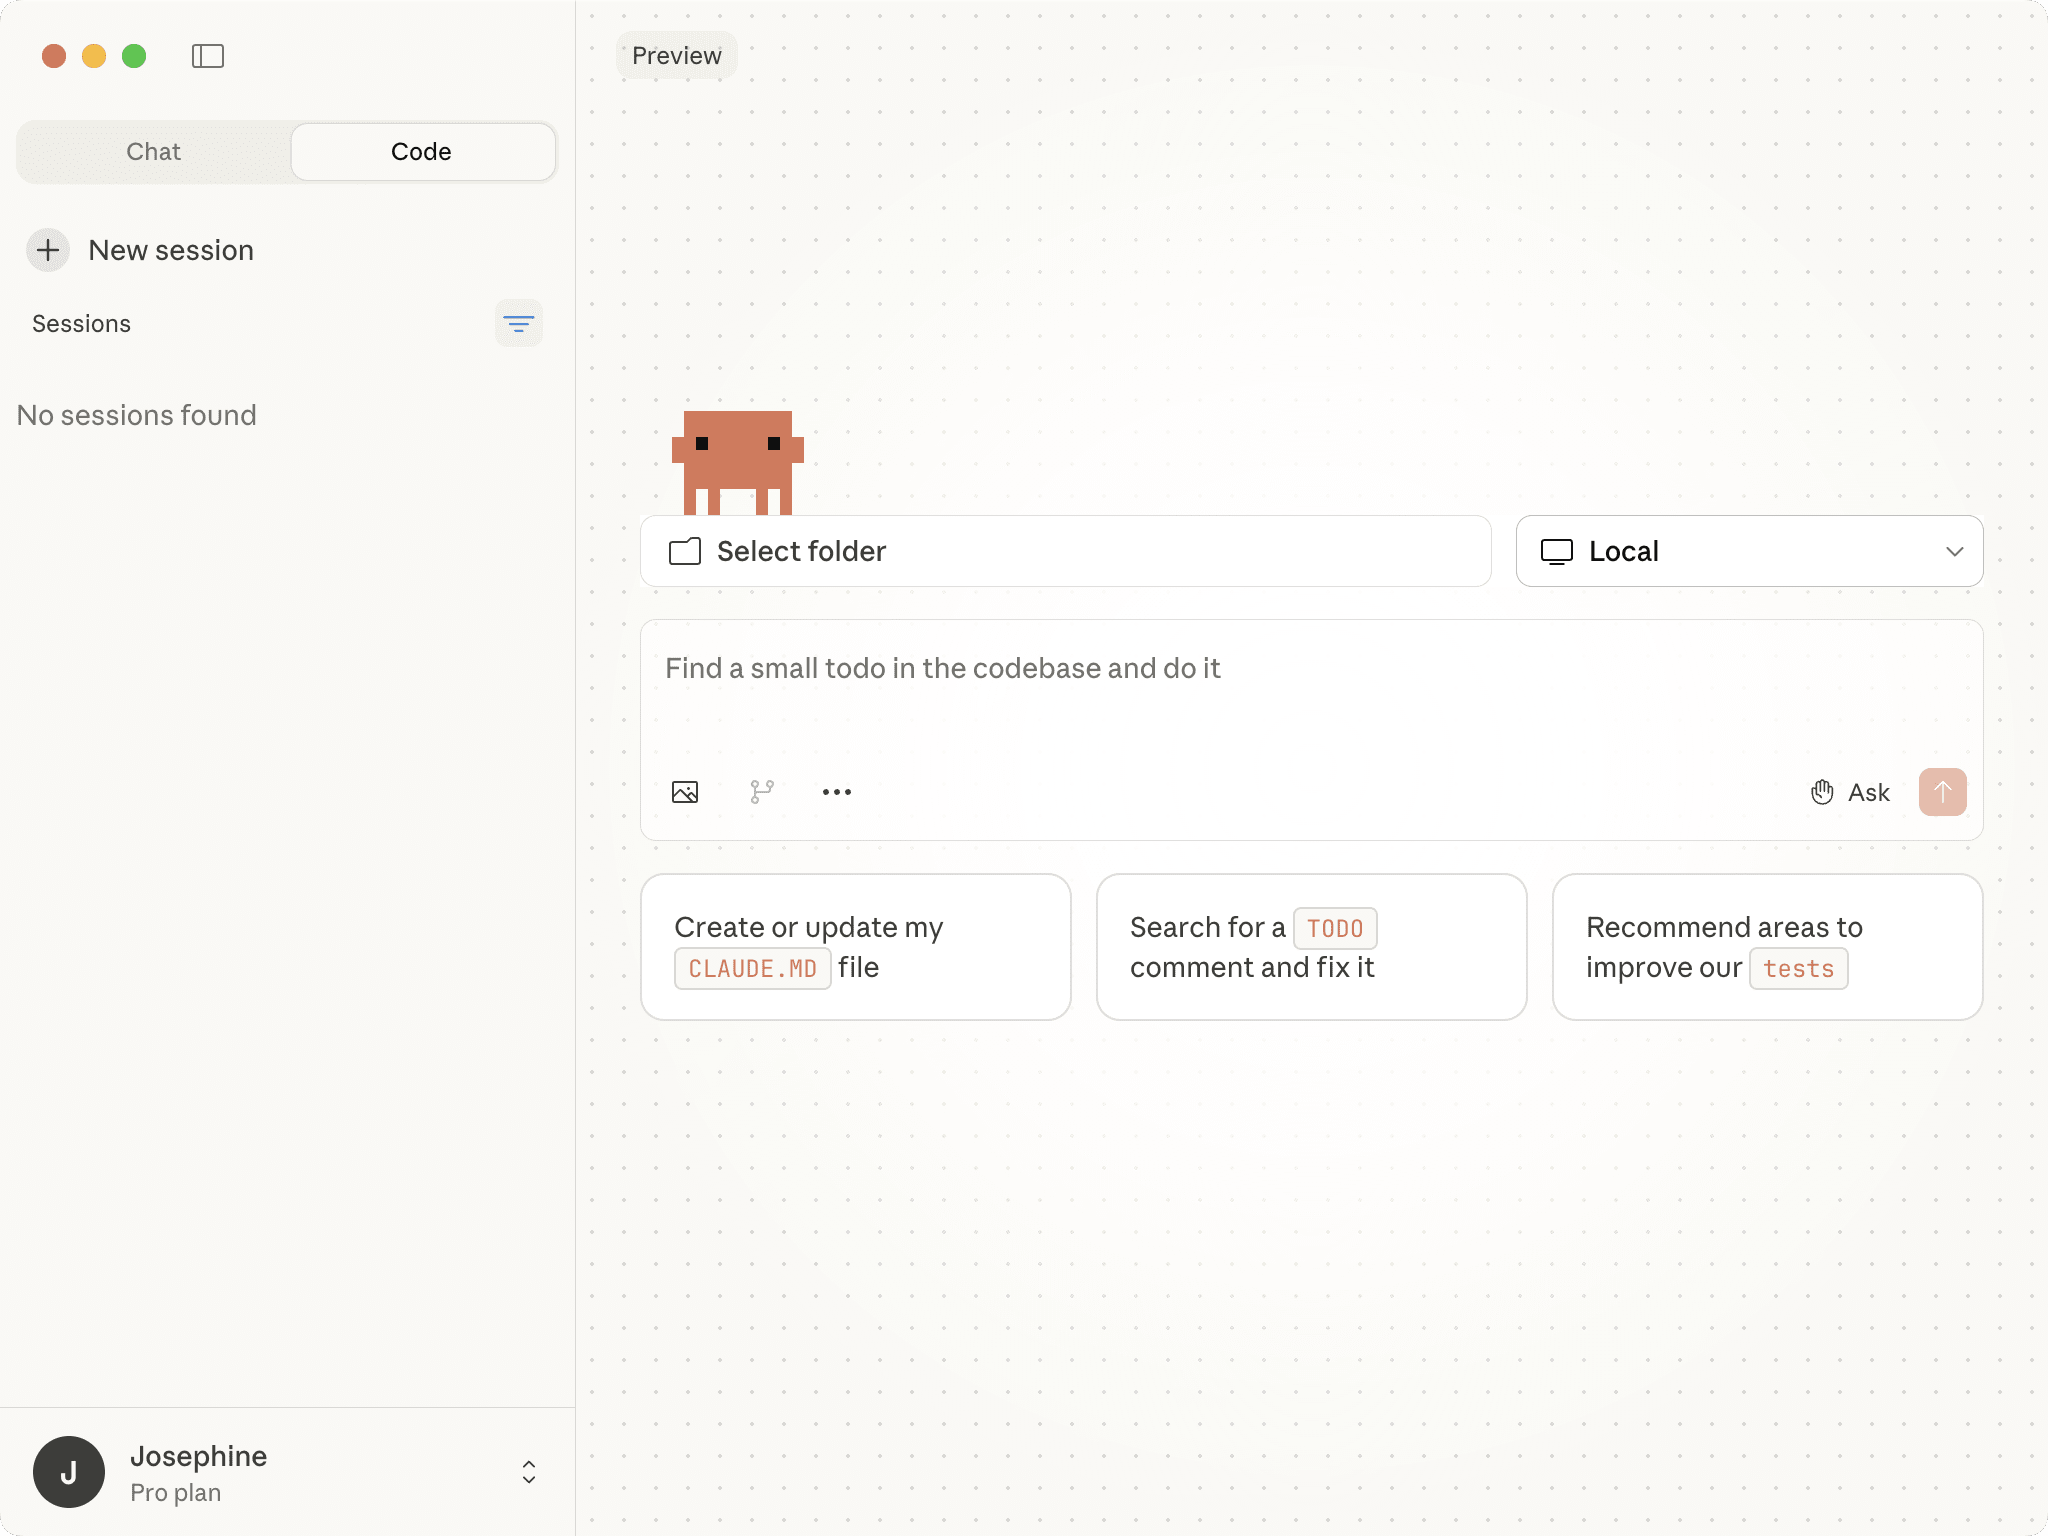 *公开教程中的 Claude Desktop Code 会话界面。接入 Xcompute 后请选择本地项目和 Local 会话。[查看截图来源](https://www.bannerbear.com/blog/how-to-install-claude-code-terminal-ide-web-desktop-setup/)*
Gateway API Key 会保存在 Claude Desktop 的本机第三方推理配置中。不要截图展示配置窗口,也不要导出并分享包含密钥的配置文件。
## 第五步:为 CLI 创建 `settings.json`
点击 **开始菜单**,输入 `PowerShell` 并打开。复制下面两行,粘贴后按 Enter:
```powershell theme={null}
New-Item -ItemType Directory -Force "$HOME\.claude"
notepad "$HOME\.claude\settings.json"
```
记事本询问是否创建文件时选择 **是**。保存时按 `Ctrl+S`。如果出现“另存为”,将 **保存类型** 改为 **所有文件**,确保文件名是 `settings.json`,而不是 `settings.json.txt`。
打开终端,执行:
```bash theme={null}
mkdir -p ~/.claude
nano ~/.claude/settings.json
```
使用 nano 时,按 `Ctrl+O` 保存,按 Enter 确认,再按 `Ctrl+X` 退出。
不要把文件放进某个项目的 `.claude` 文件夹。本教程使用用户级 `~/.claude/settings.json` 配置 CLI。Claude Desktop 的 Gateway 请使用上面的图形界面,不要依赖此文件。
## 第六步:写入 CLI 的 Xcompute 配置
将下面内容完整粘贴到 `settings.json`,把 `在这里填写你的APIKey` 替换为你的 [Xcompute API Key](https://xcompute.us/keys):
```json theme={null}
{
"$schema": "https://json.schemastore.org/claude-code-settings.json",
"env": {
"ANTHROPIC_BASE_URL": "https://intl.dualseason.com",
"ANTHROPIC_AUTH_TOKEN": "在这里填写你的APIKey",
"ANTHROPIC_MODEL": "claude-sonnet-5",
"ANTHROPIC_DEFAULT_SONNET_MODEL": "claude-sonnet-5",
"ANTHROPIC_DEFAULT_OPUS_MODEL": "claude-opus-4-8",
"ANTHROPIC_DEFAULT_HAIKU_MODEL": "claude-sonnet-5",
"ANTHROPIC_DEFAULT_FABLE_MODEL": "claude-fable-5"
}
}
```
默认推荐使用 `https://intl.dualseason.com`。如果你具备稳定的科学上网能力,可以改为 `https://xcompute.us`。Claude Code 使用 Anthropic 协议,Base URL **不要添加 `/v1`**。
`settings.json` 包含明文 API Key。不要上传到 GitHub、发送给他人或在截图中展示。JSON 最后一项后面不能有逗号。
### 每个配置项有什么作用
| 配置项 | 作用 |
| -------------------------------- | --------------------------------------- |
| `ANTHROPIC_BASE_URL` | Xcompute 的 Anthropic 协议入口,不包含 `/v1` |
| `ANTHROPIC_AUTH_TOKEN` | 你的 Xcompute API Key,以 Bearer Token 方式发送 |
| `ANTHROPIC_MODEL` | 启动时默认使用的模型 |
| `ANTHROPIC_DEFAULT_SONNET_MODEL` | 将 Sonnet 选项映射到 Xcompute 的 Sonnet 模型 |
| `ANTHROPIC_DEFAULT_OPUS_MODEL` | 将 Opus 选项映射到 Xcompute 的 Opus 模型 |
| `ANTHROPIC_DEFAULT_HAIKU_MODEL` | 为后台轻量任务指定可用模型 |
| `ANTHROPIC_DEFAULT_FABLE_MODEL` | 将 Fable 选项映射到 Xcompute 的 Fable 模型 |
模型 ID 必须与 [Xcompute 模型定价页面](https://xcompute.us/pricing) 中显示的 ID 完全一致。可用模型变化时,请同步修改对应值。
## 第七步:启动并验证 CLI
保存 `settings.json` 后,完全退出之前打开的 Claude Code,再重新打开 PowerShell 或终端。
进入你的项目目录并启动:
```bash theme={null}
cd /path/to/your-project
claude
```
如果出现“使用检测到的 API Key”之类的提示,请确认使用该 Key。进入 Claude Code 后输入:
```text theme={null}
请告诉我当前使用的模型,并分析这个项目的目录结构,不要修改任何文件。
```
也可以输入 `/status`,检查当前 API provider、Base URL 和模型信息。
## 第八步:启动并验证桌面端
1. 完全退出 Claude Desktop。
2. 重新打开 Claude Desktop,确认第三方推理配置仍处于已应用状态。
3. 点击 **Code** 标签。
4. 新建会话时将 Environment 选择为 **Local**。
5. 选择一个测试项目文件夹。
6. 输入“分析这个项目,不要修改文件”。
能正常返回内容,说明 Claude Desktop 已通过 Xcompute Gateway 工作。
不要选择 **Remote** 或云端环境来测试 Xcompute。远程会话不会使用当前电脑上应用的第三方 Gateway 配置。
## 如何切换模型
### Claude Code CLI
修改 `settings.json` 中的默认模型:
```json theme={null}
"ANTHROPIC_MODEL": "其他模型ID"
```
保存后重新打开 CLI。也可以在 CLI 中输入 `/model`,选择已映射的 Sonnet、Opus、Fable 等模型。
### Claude Desktop
重新打开 **Developer > Configure Third-Party Inference…**,在 Models 区域调整模型列表,然后点击 **Apply locally**。应用重启后,在模型选择器中选择需要使用的模型。
## 更新 Claude Code
通过 npm 安装时,三个平台都执行:
```bash theme={null}
npm update -g @anthropic-ai/claude-code
claude --version
```
原生安装版本会在后台自动更新。桌面端可以使用应用内更新,或重新访问 [官方下载页面](https://claude.ai/download)。
## 常见问题
### `claude` 命令不存在
关闭并重新打开 PowerShell 或终端,再执行:
```bash theme={null}
node -v
npm -v
npm install -g @anthropic-ai/claude-code
claude --version
```
### 桌面端找不到 Third-Party Inference 菜单
1. 退出当前登录,返回 Claude Desktop 登录页面。
2. 打开 **Help > Troubleshooting**。
3. 点击 **Enable Developer Mode**。
4. 完全退出并重新打开应用。
5. 在应用菜单中查找 **Developer > Configure Third-Party Inference…**。
### Claude Desktop 无法连接 Xcompute
确认:
1. **Inference provider** 是 Gateway。
2. **Gateway base URL** 没有 `/v1`。
3. **Credential kind** 是 Static API key。
4. **Gateway auth scheme** 是 Bearer。
5. API Key 没有前后空格,并且账户有可用额度。
6. 修改后点击了 **Apply locally**,并等待应用重新启动。
### Claude Code CLI 提示未授权
1. `ANTHROPIC_AUTH_TOKEN` 没有前后空格。
2. API Key 仍然有效且账户有可用额度。
3. `ANTHROPIC_BASE_URL` 没有 `/v1`。
4. JSON 使用英文双引号,最后一项后面没有逗号。
### 以前使用过切换工具或本地代理
本教程不需要任何本地代理。CLI 的 `ANTHROPIC_BASE_URL` 和桌面端的 **Gateway base URL** 都不要使用 `127.0.0.1` 或 `localhost`。默认配置应直接指向:
```json theme={null}
"ANTHROPIC_BASE_URL": "https://intl.dualseason.com"
```
### 模型不存在或无法使用
前往 [模型定价页面](https://xcompute.us/pricing) 检查模型 ID。模型名称必须完全一致,不能有多余空格。
## 官方资源
* [Claude Code 官方文档](https://code.claude.com/docs/)
* [Claude Desktop 官方下载](https://claude.ai/download)
* [Claude Code 设置说明](https://code.claude.com/docs/en/settings)
* [Claude Desktop Gateway 官方配置](https://claude.com/docs/third-party/claude-desktop/gateway)
* [带截图的 Claude Desktop 安装教程](https://www.bannerbear.com/blog/how-to-install-claude-code-terminal-ide-web-desktop-setup/)
* [Xcompute API Key](https://xcompute.us/keys)
*公开教程中的 Claude Desktop Code 会话界面。接入 Xcompute 后请选择本地项目和 Local 会话。[查看截图来源](https://www.bannerbear.com/blog/how-to-install-claude-code-terminal-ide-web-desktop-setup/)*
Gateway API Key 会保存在 Claude Desktop 的本机第三方推理配置中。不要截图展示配置窗口,也不要导出并分享包含密钥的配置文件。
## 第五步:为 CLI 创建 `settings.json`
点击 **开始菜单**,输入 `PowerShell` 并打开。复制下面两行,粘贴后按 Enter:
```powershell theme={null}
New-Item -ItemType Directory -Force "$HOME\.claude"
notepad "$HOME\.claude\settings.json"
```
记事本询问是否创建文件时选择 **是**。保存时按 `Ctrl+S`。如果出现“另存为”,将 **保存类型** 改为 **所有文件**,确保文件名是 `settings.json`,而不是 `settings.json.txt`。
打开终端,执行:
```bash theme={null}
mkdir -p ~/.claude
nano ~/.claude/settings.json
```
使用 nano 时,按 `Ctrl+O` 保存,按 Enter 确认,再按 `Ctrl+X` 退出。
不要把文件放进某个项目的 `.claude` 文件夹。本教程使用用户级 `~/.claude/settings.json` 配置 CLI。Claude Desktop 的 Gateway 请使用上面的图形界面,不要依赖此文件。
## 第六步:写入 CLI 的 Xcompute 配置
将下面内容完整粘贴到 `settings.json`,把 `在这里填写你的APIKey` 替换为你的 [Xcompute API Key](https://xcompute.us/keys):
```json theme={null}
{
"$schema": "https://json.schemastore.org/claude-code-settings.json",
"env": {
"ANTHROPIC_BASE_URL": "https://intl.dualseason.com",
"ANTHROPIC_AUTH_TOKEN": "在这里填写你的APIKey",
"ANTHROPIC_MODEL": "claude-sonnet-5",
"ANTHROPIC_DEFAULT_SONNET_MODEL": "claude-sonnet-5",
"ANTHROPIC_DEFAULT_OPUS_MODEL": "claude-opus-4-8",
"ANTHROPIC_DEFAULT_HAIKU_MODEL": "claude-sonnet-5",
"ANTHROPIC_DEFAULT_FABLE_MODEL": "claude-fable-5"
}
}
```
默认推荐使用 `https://intl.dualseason.com`。如果你具备稳定的科学上网能力,可以改为 `https://xcompute.us`。Claude Code 使用 Anthropic 协议,Base URL **不要添加 `/v1`**。
`settings.json` 包含明文 API Key。不要上传到 GitHub、发送给他人或在截图中展示。JSON 最后一项后面不能有逗号。
### 每个配置项有什么作用
| 配置项 | 作用 |
| -------------------------------- | --------------------------------------- |
| `ANTHROPIC_BASE_URL` | Xcompute 的 Anthropic 协议入口,不包含 `/v1` |
| `ANTHROPIC_AUTH_TOKEN` | 你的 Xcompute API Key,以 Bearer Token 方式发送 |
| `ANTHROPIC_MODEL` | 启动时默认使用的模型 |
| `ANTHROPIC_DEFAULT_SONNET_MODEL` | 将 Sonnet 选项映射到 Xcompute 的 Sonnet 模型 |
| `ANTHROPIC_DEFAULT_OPUS_MODEL` | 将 Opus 选项映射到 Xcompute 的 Opus 模型 |
| `ANTHROPIC_DEFAULT_HAIKU_MODEL` | 为后台轻量任务指定可用模型 |
| `ANTHROPIC_DEFAULT_FABLE_MODEL` | 将 Fable 选项映射到 Xcompute 的 Fable 模型 |
模型 ID 必须与 [Xcompute 模型定价页面](https://xcompute.us/pricing) 中显示的 ID 完全一致。可用模型变化时,请同步修改对应值。
## 第七步:启动并验证 CLI
保存 `settings.json` 后,完全退出之前打开的 Claude Code,再重新打开 PowerShell 或终端。
进入你的项目目录并启动:
```bash theme={null}
cd /path/to/your-project
claude
```
如果出现“使用检测到的 API Key”之类的提示,请确认使用该 Key。进入 Claude Code 后输入:
```text theme={null}
请告诉我当前使用的模型,并分析这个项目的目录结构,不要修改任何文件。
```
也可以输入 `/status`,检查当前 API provider、Base URL 和模型信息。
## 第八步:启动并验证桌面端
1. 完全退出 Claude Desktop。
2. 重新打开 Claude Desktop,确认第三方推理配置仍处于已应用状态。
3. 点击 **Code** 标签。
4. 新建会话时将 Environment 选择为 **Local**。
5. 选择一个测试项目文件夹。
6. 输入“分析这个项目,不要修改文件”。
能正常返回内容,说明 Claude Desktop 已通过 Xcompute Gateway 工作。
不要选择 **Remote** 或云端环境来测试 Xcompute。远程会话不会使用当前电脑上应用的第三方 Gateway 配置。
## 如何切换模型
### Claude Code CLI
修改 `settings.json` 中的默认模型:
```json theme={null}
"ANTHROPIC_MODEL": "其他模型ID"
```
保存后重新打开 CLI。也可以在 CLI 中输入 `/model`,选择已映射的 Sonnet、Opus、Fable 等模型。
### Claude Desktop
重新打开 **Developer > Configure Third-Party Inference…**,在 Models 区域调整模型列表,然后点击 **Apply locally**。应用重启后,在模型选择器中选择需要使用的模型。
## 更新 Claude Code
通过 npm 安装时,三个平台都执行:
```bash theme={null}
npm update -g @anthropic-ai/claude-code
claude --version
```
原生安装版本会在后台自动更新。桌面端可以使用应用内更新,或重新访问 [官方下载页面](https://claude.ai/download)。
## 常见问题
### `claude` 命令不存在
关闭并重新打开 PowerShell 或终端,再执行:
```bash theme={null}
node -v
npm -v
npm install -g @anthropic-ai/claude-code
claude --version
```
### 桌面端找不到 Third-Party Inference 菜单
1. 退出当前登录,返回 Claude Desktop 登录页面。
2. 打开 **Help > Troubleshooting**。
3. 点击 **Enable Developer Mode**。
4. 完全退出并重新打开应用。
5. 在应用菜单中查找 **Developer > Configure Third-Party Inference…**。
### Claude Desktop 无法连接 Xcompute
确认:
1. **Inference provider** 是 Gateway。
2. **Gateway base URL** 没有 `/v1`。
3. **Credential kind** 是 Static API key。
4. **Gateway auth scheme** 是 Bearer。
5. API Key 没有前后空格,并且账户有可用额度。
6. 修改后点击了 **Apply locally**,并等待应用重新启动。
### Claude Code CLI 提示未授权
1. `ANTHROPIC_AUTH_TOKEN` 没有前后空格。
2. API Key 仍然有效且账户有可用额度。
3. `ANTHROPIC_BASE_URL` 没有 `/v1`。
4. JSON 使用英文双引号,最后一项后面没有逗号。
### 以前使用过切换工具或本地代理
本教程不需要任何本地代理。CLI 的 `ANTHROPIC_BASE_URL` 和桌面端的 **Gateway base URL** 都不要使用 `127.0.0.1` 或 `localhost`。默认配置应直接指向:
```json theme={null}
"ANTHROPIC_BASE_URL": "https://intl.dualseason.com"
```
### 模型不存在或无法使用
前往 [模型定价页面](https://xcompute.us/pricing) 检查模型 ID。模型名称必须完全一致,不能有多余空格。
## 官方资源
* [Claude Code 官方文档](https://code.claude.com/docs/)
* [Claude Desktop 官方下载](https://claude.ai/download)
* [Claude Code 设置说明](https://code.claude.com/docs/en/settings)
* [Claude Desktop Gateway 官方配置](https://claude.com/docs/third-party/claude-desktop/gateway)
* [带截图的 Claude Desktop 安装教程](https://www.bannerbear.com/blog/how-to-install-claude-code-terminal-ide-web-desktop-setup/)
* [Xcompute API Key](https://xcompute.us/keys)